| Stub
Tenon & Groove |
|
One type
of joint that’s often used in frame and panel construction
is a stub tenon and groove joint.
There are two reasons for using stub tenon and groove joinery.
First, it provides a quick, easy way to join the solid wood
legs and rails of the chest to the plywood panels. Second, it
creates an extremely strong joint.
|
 |
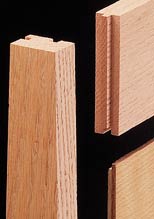
To see how the stub tenon and groove joints fit together, take
a look at the photo right. Notice that there are two grooves
in the leg and a single groove in the bottom edge of the rail.
These grooves hold a stub (short) tenon on the end of the rail
and a tongue that’s formed on the plywood panel.
So what makes a stub tenon and groove joint so strong? The plywood
panel is glued into the grooves, so the panel itself actually
becomes part of the joint. This increases the glue surface,
making the entire unit very strong.
The Grooves
To cut a stub tenon and groove joint,
I start with the grooves. Then the tenons (and tongues) can
be cut to fit. The width of the grooves is sized to match the
thickness of the stub tenons and tongues (1/4" wide in
my case). As for depth, it’s best to cut the grooves slightly
deeper (1/32") than the length of the tenons and tongues
(9/32" deep). This provides room for glue at the bottom
of the groove. |
 |
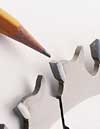 |
| The
raker teeth on most dado blades are ground flat, so using
a single outer blade of a stacker dado set produces a
flat bottomed groove. |
|
Leg Grooves
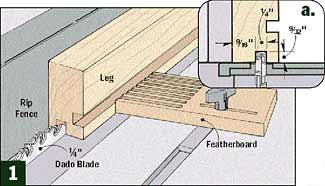
With that in mind, the first
step is to set up the table saw to cut grooves in the legs.
Start by mounting a 1/4" dado blade and adjusting its height
to make a 9/32"-deep cut (Fig. 1a). Then lock the rip fence,
attach a featherboard to hold the workpiece against the fence,
and make a single pass to cut each groove (Fig. 1).
Rail Grooves
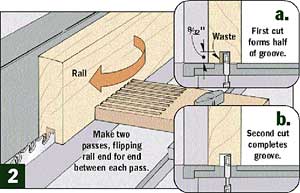
The setup for cutting grooves
in the rails is different. That’s because these grooves
are |
| centered
on the thickness of the rails. To make it easy to cut a
centered groove, I use a single saw blade (see margin photo)
and make two passes. Start by positioning the rip fence so the
blade is roughly centered on the thickness of the rail, and
make a pass (Figs. 2 and 2a). Then without moving the rip fence,
flip the piece end for end and take a second pass (Fig. 2b).
If necessary, nudge the fence away from the blade and make two
more passes until you end up with a 1/4"-wide groove. |
 |
| |
 |
| |
 |
Stub
Tenons & Tongues
After the grooves are cut, the next
step is to cut the stub tenons and the tongues to fit.
STUB TENONS.
The stub tenons serve two purposes. First, they keep the rails
aligned so they won’t twist in relation to the legs. Second,
they fill the ends of the grooves in the legs.
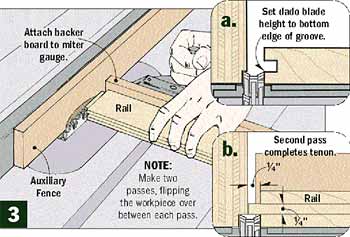
SETUP. Here again, I use a dado
blade to cut the stub tenons. As you can see in (Figs. 3 and
3a), an auxiliary fence acts as a stop that determines the length
of the tenon. Set the auxiliary fence 1/4" from the blade.
This will produce a tenon that’s slightly shorter than
the depth of the groove. As a result, the tenon won’t
“bottom out” in the groove, and you’ll get
a tight-fitting joint.
To accurately set the height of the blade, use one of the grooved
pieces (Fig. 3a). This determines the thickness of the tenon.
With the blade height set, the idea is to make two passes, flipping
the workpiece over between each pass (Fig. 3b).
The last step in the setup process is to check the miter gauge
with a try square. It must be 90° to the rip fence. If it’s
not, the tenon’s shoulders won’t be perpendicular
to the edge of the workpiece, and the assembly won’t be
square. |
 |
|
|
 |
TRIAL
CUTS. Before cutting the actual workpiece, it pays to
make a trial cut in a test piece. Just be sure that the test
piece matches the thickness of the workpiece.
To make a trial cut, butt the end of the test piece against
the fence and use the miter gauge to guide it through the blade.
This creates one cheek of the tenon. Then flip the test piece
over and repeat the process to cut the other cheek.
TEST FIT. Now check to see if the
test stub tenon fits the groove in the leg. The goal is a friction
fit - snug, not tight. Also, the shoulders of the tenon should
fit tightly against the leg. Once you’re satisfied with
the fit, go ahead and cut the tenons on both ends of each rail. |
 |
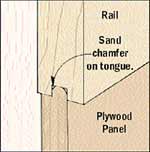 |
| To
make it easy to fit the panel into the groove, sand a
small champher on the edges of the tongue. |
|
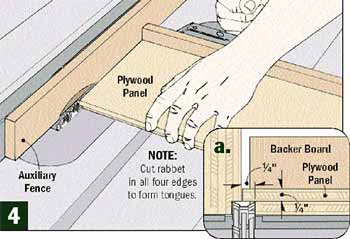
TONGUES.
At this point, you can concentrate on the tongues that wrap
around all four edges of the plywood panel. They’re formed
by cutting a rabbet in each edge. To cut the rabbets, partially
“bury” a dado blade in an auxiliary fence (Figs.
4 and 4a). Here again, an auxiliary fence attached to
the rip fence serves as a stop to establish the length of the
tongue. As for the blade height, adjust it so the rabbet that’s
cut forms a 1/4"-thick tongue. As before, make trial cuts
in a test piece to ensure a snug fit.
DRY ASSEMBLE & GLUE. It pays
to dry assemble all the pieces to make sure they fit together
as a unit before gluing them up. Be sure to check for tight
joints and square corners |
 |
| |
 |
| To glue up the
assembly, spread glue on each tenon and also into the grooves.
Keep in mind that it’s the large glue surface that gives
a stub tenon and groove joint its strength. So it’s important
to brush on a continuous film of glue. This ensures a strong,
long-lasting joint. |
 |

|
| Troubleshooting
Stub Tenon & Groove |
 |
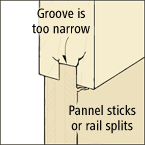 |
| FIGURE
1 -The groove can cause the rail to splite. |
|
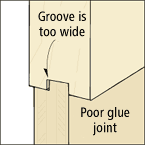 |
| FIGURE
2 - If the groove is too wide, it results in poor
glue joint. |
|
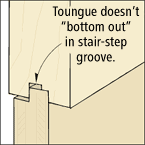 |
| FIGURE
3 - A "stair-step" groove can prevent
the panel from seating, so hold the rail down tightly
against the table saw during the cut |
|
 |
|


